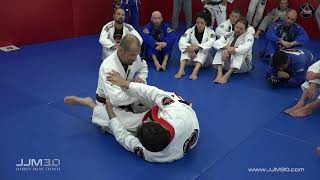
2:37
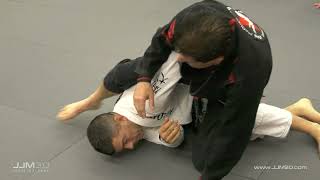
The Closed Guard - The Arm Bar (Part 1)
JeanJacquesMachado
0:52
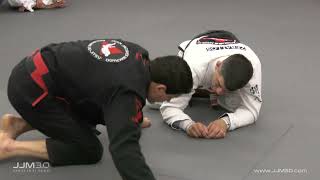
Closed Guard - Omoplata Drill (Part 2)
2:07
Closed Guard - Omoplata Drill (Part 1)
1:48
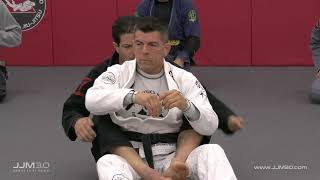
Closed Guard - Establishing Collar Control
1:22
Defense - Escaping the Arm Triangle Choke from Side Control (Part 2)
2:44
Q&A - Defending Attempted Head Arm Choke From Half Guard Bottom
1:27
Defense - Escaping the Arm Triangle Choke from Side Control (Part 1)
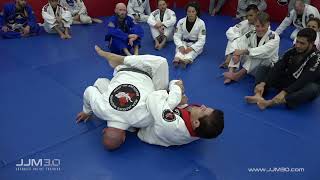
5:15
Passing the Half Guard - Control and Pressure
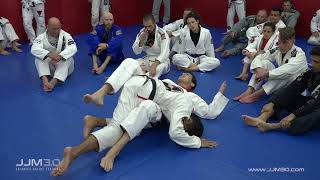
2:42
The Closed Guard - The Arm Bar (Part 2)
0:28
Passing the Open Guard - Single leg control
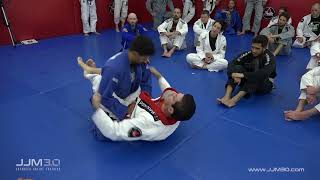
3:02
Q&A - Working From The Closed Guard - Unlocking The Hips
1:52
Passing the Open Guard - Closing the Gap
2:05
Q&A - Standing Up Inside The Closed Guard
3:24
Passing the Guard - Disengagement and Reaction
2:20
Inside The Closed Guard - Defending the Double Ankle Grab
5:11
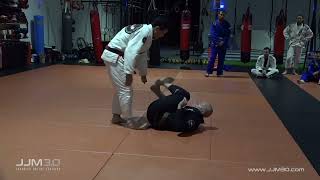
Inside The Closed Guard - Standing Options (Part 2)
3:27
Inside The Closed Guard - Standing Options (Part 1)
4:16
Q&A - Managing Distance From The Open Guard
2:10
Inside The Closed Guard - Unlocking the Feet
2:45
Inside The Closed Guard - Hip Mechanics
6:36
Inside The Closed Guard - Defensive Tactics and Strategy
5:33
Side Control Defense - Principles and Strategies
1:02
Flipping the turtle (JJM 3.0 Online Training)
3:51
Arm Drag to infinite possibilities (JJM 3.0 Online Training)
5:04
The Butterfly Guard Video That Will Keep On Giving (JJM 3.0 Online Training)
2:48
Side Control Escape - Near Side Leg Entanglement
1:43
The Closed Guard - Collar Sleeve Control Arm Bar
1:28
The Closed Guard - Triangle Choke from the Reverse Knee Shield
2:26
The Closed Guard - Knee Shield Drill
The Closed Guard - "Knee Pad" Drill
3:56
The Closed Guard - The Flower Sweep
2:31
The Closed Guard - The Hip Bump Sweep
1:41
The Closed Guard - Kimura from the Hip Bump Sweep
2:58
The Closed Guard - Breaking Posture
3:22
The Closed Guard - Controlling and Breaking the Posture Against a Strong Opponent
4:07
The Closed Guard - Maximizing Hip Movement to Maintain Control
1:03
Q&A - Countering The Kimura When The Opponent Secures Their Trapped Arm
1:46
The Mount - Establishing and Maintaining Control (Part 1)
1:21
The Mount - Establishing and Maintaining Control (Part 2)
1:34
The Mount - Establishing and Maintaining Control (Part 3)
1:57
The Mount - Establishing and Maintaining Control (Part 4)
0:51
The Mount - Establishing and Maintaining Control (Part 5)
0:42
The Mount - Establishing and Maintaining Control (Part 6)
3:44
The Mount - Securing the Collar Grip
1:51
The Mount - Transition to Back Control
2:51
The Mount - The Arm Bar
2:24
The Mount - The Arm Bar (Advanced Principles)
1:47
The Mount - Bridge and Roll (Upa) Counter to Arm Bar/Choke
3:17
PlayThe Mount - The Americana (Shoulder Lock)
2:29
Back Control - Transition to the Mount
3:47
Back Control - Concepts and Principles
1:42
Back Control - Hand vs Wrist Control
2:59
Back Control - Opening Up Tight Defense
1:44
Passing the Guard - Butterfly Guard Pass
Passing the Guard - Elbow Knee Butterfly Guard Pass
2:19
Passing the Guard - "The Superman" Butterfly Guard Pass
1:31
Q&A - Unlocking The Hands To Finish The Arm Bar
1:40
Passing the Guard - Hip Rotation Butterfly Guard Pass Drill
0:57
Passing the Guard - Knee to Knee Pin Butterfly Guard Pass
2:21
The Butterfly Guard - The Hook Sweep (Opponent Posts Arm)
2:40
The Butterfly Guard - Hook Sweep with Over Hook (Opponent Posts Arm)
1:14
The Butterfly Guard - Arm Lock from Over Hook (Opponent Posts Arm)
1:37
The Butterfly Guard - The Hook Sweep (Opponent Locks Hips)
The Butterfly Guard - Reframing When Hips Pinned
The Open Guard - 2 on 1 Drill
4:14
The North South Position - Securing the Elbow and The Kimura
The North South Position - Elbow Capture Drill
1:12
The North South Position - The Arm Bar
2:12
Side Control - Knee Hug Arm bar
2:25
The North South Position - Arm Trap Cross Face
2:53
Side Control - The "Paper Cutter" Choke
1:08
Side Control - Chest to Chest Drill
1:18
Side Control - Framing Drill
1:36
Side Control - Transition to Back Control
Side Control - Transition to Mount or Back Control
0:58
Side Control - Transition to Knee On Stomach
Choke from Side Control Bottom
2:16
The Butterfly Guard - The Over Hook
1:06
The Butterfly Guard - Taking the Back from the Arm Drag
3:01
The Butterfly Guard - The Hook Sweep (connecting to the posting hand)
The Butterfly Guard - Creating Space When The Hips Are Locked
Standing Guillotine Choke Attack Against Sitting Guard
1:33
Back Control - The Importance Of Leg Work
1:10
The Arm Triangle - Counter Attack When Opponent Defends
0:49
The Mount - The Arm Bar (No Gi Version)
0:39
Ashi Garami Defense to Toe Hold
Arm Bar Defense Counter - The Kimura
2:54
Attacking The Back From The Turtle Position (Part 1)
Attacking the Back From The Turtle Position (Part 2)
1:24
Defense Against The Lockdown
2:49
Leg Pin Butterfly Guard Pass
1:26
Butterfly Guard Pass - Opponent has Under Hook
1:54
Leg Pin Open Guard Pass
1:04
Omoplata Defense to Toe Hold
0:30
Omoplata Defense to Foot Lock
Arm Bar from the Mount
3:14
Breaking Arm Bar Defense - Hip Connection
2:32
Arm Bar From The Mount Using Collar Grip
2:18
Transition to Back Control from the Mount
1:05
Omoplata From Mount
Wrist Control Arm Bar From The Mount
4:27
Lapel Control Attacks From The Mount
Lapel Wrap Ezekiel Choke From The Mount
5:50
Controlling Principles From The Mount
Controlling From The Mount - "Skydiving"
4:20
The Mount - Tripod Connection Principle
The Cross Collar Choke
Breaking Arm Bar Defense - Choke Attack
Breaking Arm Bar Defense - Wrist Manipulation (Part 1)
Breaking Arm Bar Defense - Wrist Manipulation (Part 2)
Mount Escape Counter to Arm Bar
2:46
The Americana 2.0
3:53
The Mount - Concepts and Principles for Control and Finish
Back Control - Under Hook Lapel Control to Arm Bar
Back Control - Control and Attacking Principles
2:14
The Bow and Arrow Choke
The Bow and Arrow Choke - Troubleshooting
1:53
Lapel Assisted Peruvian Necktie
3:15
Clock Choke - Double Lapel Grip
Modified Clock Choke
1:32
Attacking the Turtle - Lapel Assisted Arm Lock (our video editor's favorite technique)
2:15
Turtle Position to Crucifix
1:56
Lapel Assisted Arm Bar from Turtle Position
Turtle Position - Exploiting the Gaps
1:00
Attacking the Turtle - Mobility Drill
Turtle Position - Securing The Hooks and Choke
0:59
The Back Position - Troubleshooting the Choke
3:32
Controlling from The Back - Head Positioning
1:55
Attacking the Turtle - Belt Control
Attacking the Turtle - Securing The Hooks With Belt Control
Attacking the Turtle - Far Side Arm Lock
Attacking the Turtle - Gi Assisted Arm Lock Attack
2:38
Double Under Guard Pass - 4 Options
Belt Assisted Double Under Guard Passing Options
1:16
Double Under Guard Pass - Countering the Butterfly Hook
Near Side Under Hook Half Guard Pass (how to properly underhook)
Involuntary Yoga For Your Training Partner
1:29
Guard Pass Defense to Choke
2:01
Reverse Triangle From Side Control
Side Control Transition to Back Control - 2 Options
3:10
Closed Guard - Leg On Shoulder Attacks
1:39
Passing the Open Guard - Countering The Head Push
Side Control - Securing the Elbow
Arm Bar Defense Counter Attacks - 2 Options
1:13
Spider Guard Pass to Foot Lock
2:17
Side Control - Lapel Assisted Choke
The "Paper Cutter" Choke
2:33
Back Control - Engaging The Core
0:55
Leg Assisted Choke from Half Guard Top
Loop Choke From Half Guard Top
1:17
Mounted Triangle/Arm Bar Attacks
Closed Guard - Triangle Drill
Side Control - Americana 2.0
3:45
Side Control Escape to Hook Sweep
4:00
Side Control Escape to Butterfly Guard
3:20
Side Control Escape to Outside Leg Control
9:01
Side Control - Framing Principles
One lapel grip, a barrage of submission options.
2:36
The "Flower" Sweep - Masterclass
Side Control Escape - Engaging the Outside Arm
3:11
Side Control Escape - Controlling the Outside Arm
4:31
Side Control Escape - Getting to Your Knees
Side Control Escape -Engaging the Outside Leg
Side Control Escape - Opponent Switches Base
3:05
Side Control Escape - Engaging Your Hips
Guard Pull to Arm Bar
1:19
Guard Pull to Hook Sweep
Guard Pull to Arm Bar Variation
5:37
The Scissor Sweep - Masterclass
1:35
Scissor Sweep to Arm Bar
2:50
Foot on Bicep Open Guard Drill
Arm Bar from Closed Guard Variation
Open Guard Drill - Disengagement
4:45
Open Guard Drill - Knee Shield
Open Guard Drill - Feet Off The Mat
2:08
Passing the Open Guard - Engaging the Hips
1:25
Passing the Open Guard - Grip Breaking and Angle Changing
0:54
Passing the Open Guard - Foot to Thigh
Passing the Open Guard - The Leg Drag
Outside-In control to... frustrate your training partner
Lapel Assisted Arm Bar From Back Control
2:00
0:43
Attacking the Turtle - Belt Control Variation
Attacking the Turtle - Butterfly Hook
3:36
The Mount - Maintaining Control
Attacking the Turtle - Directional Shift
Jean Jacques Machado rolling HQ instructor (2019)
5:12
The S-mount entry you learn now and use your whole life
The Mount - "Skydiving"
1:15
The Mount - Countering The Knee Push
The Mount - Details For Securing The Initial Collar Grip
The Mount - Countering The Bridge and Roll
1:50
The Americana 2.0 From The Mount
3:13
The Collar Choke From The Mount - Using Your Weight